Friday, February 28, 2014

Thinking of You


Since I've been having fun with watercolors lately, I thought I would dig out my watercolor crayons.  This is one of my favorite color mediums!  Here I've colored on some flowers from Bloom and Grow from Verve and spritzed them with water.  Love the effect it gives!    The simple stamped sentiment is from Kind Words.  Verve just has the best sentiments!!  :)

2.28.14


****I have a winner to announce from the Simon Says Stamp Spring Release Blog Hop.............Betty Meyskens!!!!  Huge congrats!!!

Thanks for sharing a part of your day with me here!

{Thinking of You}
Stamps:  Kind Words, Bloom and Grow (Verve)
Paper:  Basic Gray (SU), White (PTI)
Ink:  Versafine black
Misc:  Watercolor Crayons, Clear Epoxy Stickers

Thursday, February 27, 2014

You make me HAPPY!


I've been trying new techniques lately with some older products in my stash.  You know it's funny you "find" things when you start to clean and that's what I've been doing in my craft room (one day I'll be able to call it a studio when its cleaned! hehe).


So I pulled out some Mister Huey's mists and added some splatter and drops to a white card panel.  This was fun and so random!!!  I stamped a grouped star image from Inner Rock Star in various matching colors over my splattered background.  My banners were made using the Tag Me Dies.......just trim off the top part of the tag and you now have a short banner!  I've stamped my sentiment from Bring on the Merry with StazOn and then sewed on 2 of the Tag Me "banners".  The die cut "happy" is from SSS.  I love to mix and match products!!!


2.27.14


Thanks for sharing a part of your day with me!

{You make me HAPPY}
Stamps:  Inner Rock Star, Bring on the Merry (Reverse Confetti)
Paper:  White, Pure Poppy (PTI), Vellum
Ink:  Harvest Gold, Aqua Mist (PTI), StazOn
Dies:  Tag Me Dies (Reverse Confetti), Happy Birthday Die (SSS)
Misc:  Mister Huey's Mists, Sewing Machine

Wednesday, February 26, 2014

You are awesome.


First......I can't get that song out of my head (Everything is Awesome)!  Has anyone seen The LEGO Movie yet?  If you have, then you know what song I'm talking about!  LOL  If not, feel free to check it out HERE.  Go ahead......it's catchy and I'll bet you will find yourself singing it later!

ANYWAY.......forward to my card post

I am really enjoying using stripes lately.  Trendy?  yes.   Fun?  yes.  I've been seeing stripe patterns everywhere that I can't wait to try out.  I believe I saw this pattern a while back on a decorative pillow so I thought I'd give it a try using On the Strip 2 from Neat & Tangled.

I started by randomly stamping the first stripe and used that as my building block for the pattern.  I found that if you get the stripe stamp perfectly straight on your block (I use a Martha Stewart footed block) then stamping these stripes is a breeze!  

2.26.14

This card will go to my daughter.......because she is awesome!  
Thanks for sharing a part of your day with me!

{YOU ARE AWESOME}
Stamps:  On the Strip 2, You + Me, Kindness Matters (Neat & Tangled)
Paper:  White (PTI)
Ink:  Fresh Ink/AMuse, Onyx Black (Versafine)
Misc:  Enamel Dots (MME), Foam Adhesive

Friday, February 21, 2014

Simon Says Stamp Spring Release Blog Hop!


Welcome to the Simon Says Stamp Spring Release Blog Hop!  I'm think I'm probably just as excited as you for the release of all the new products from SSS.  I can't wait to hop around myself to see the fabulous inspiration from this list of designers!!!  

You should have arrived from the blog of Lorraine Aquilina but if not you can start back at the Simon Says Stamp blog to get started.  There are 17 stops on the hop so make sure you visit them all for your chance at a SSS Goody Bag!  Your next stop is Lisa Addesa.


I get to share an awesome new stamp set called Hello You with the coordinating Big You die.  I thought I'd show off how fabulous this new die is by using LOTS of Simon Says Stamp cardstock!  I started by laying down a rainbow of color cardstock strips onto adhesive covered cardstock and then die cutting with the Big You die.  To get the die to cut through all the layers the first time, I used my metal shim.  Worked perfectly.

AmyBigHugsfinal2

The sentiment from Hello You was heat embossed with white embossing powder onto some vellum.  Yes more vellum!  :)  My 'you' die cut panel was corner rounded and adhered with foam adhesive underneath the sentiment.  For that final touch, I've sewn the vellum directly to my Island Blue card base.

AmyBigHugsfinal

Now here's the fun part!  Simon Says Stamp is giving away a goody bag to ONE commenter on every blog in the hop......that's 17 different chances to win!!  Comments will close at 6:00pm EST on Thursday, February 27, 2014.  A complete list of winners will be posted over on the Simon Says Stamp blog on Friday, February 28, 2014.

Here's the full list of amazing designers for the Spring Release Blog Hop:

Amy Kolling---->ME!
Lisa Addesa

Thanks for sharing a part of your day with me!

{Big hugs for YOU}
Stamps:  Hello You (Simon Says Stamp)
Paper:  Colored Cardstock (Simon Says Stamp), White (PTI)
Ink:  Versamark
Dies:  Big You die (Simon Says Stamp)
Misc:  White Embossing Powder, Foam Adhesive, Corner Chomper, Sewing Machine

Thursday, February 20, 2014

Stripes anyone?


Hello! Since I still had watercolor resist on the brain......I thought I'd make another card using some Reverse Confetti.  


I've used Dream in Color for my sentiment and stamped some So Stripey in the background.  I love my Distress Inks......I used Barn Door, Spiced Marmalade, Mustard Seed, Mowed Lawn, Broken China, Seedless Preserves simply brushed with a dab of water over my heat embossed sentiment!

2.20.13


{Color outside the Lines}
Stamps:  Dream in Color, So Stripey (Reverse Confetti)
Paper:  Colored Stripes (PTI), Island Indigo (SU)
Ink:  Versamark, Distress Inks (listed above)
Misc:  Enamel Accent (Chalk Studio by MME), Clear Embossing Powder

Neat and Tangled Release: Diamonds


Welcome back to the last day of preview of the newest release from Neat & Tangled!  Better yet....they are all available NOW in the shop!  Wahoo!


AmyDiamonds2

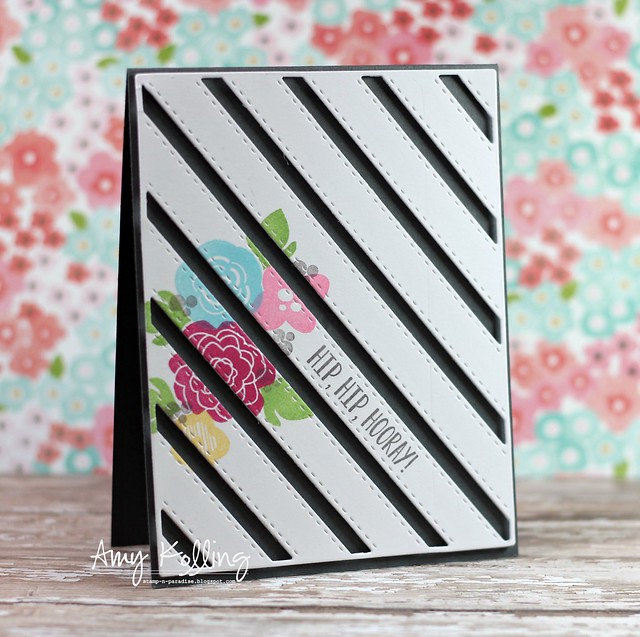
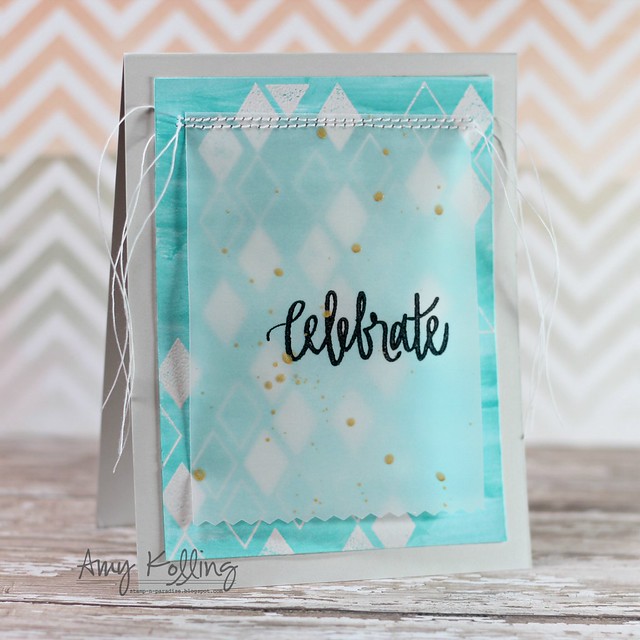
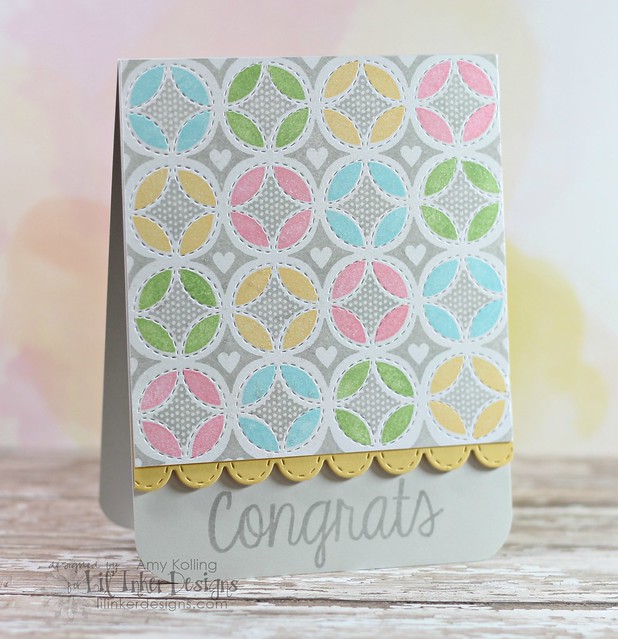
Today we are sharing a mini stamp called Diamonds.  Oh what we can do with this one!!!  I have so many ideas for these diamonds!!!  I love the randomness of the diamonds!!

***Disclaimer:  I used Distress Ink {again}, Gold {again}, and Vellum {again}......hehe***

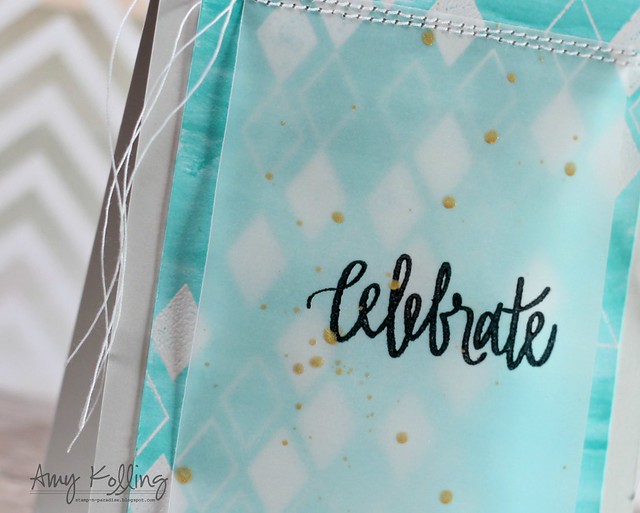
I started by clear heat embossing the Diamond pattern stamp twice on a white cardstock.  I then did a Watercolor Resist technique with my Distress Ink in Peacock Feathers.  I literally just painted the color on in a back and forth motion but since I didn't use watercolor paper, I had to be quick and not use a lot of water.  To soften this panel, I stamped Celebrate from Just for You in Staz-On black onto a block of vellum and splattered some Heidi Swapp Color Shine in Gold across and let it dry.  To adhere my vellum panel, I sewed 2 lines across leaving the threads loose and long.  As a last minute detail, I used my pinking shears across the bottom of the vellum.

AmyDiamonds

I'd LOVE to hear what you think about this card......it really didn't take much time to do this technique if you were wanting to try this for yourself!

That's all for today but make sure to stop by the Neat & Tangled blog for more inspiration from the rest of the DT and remember the new sets are available NOW in the shop!!!!

{Celebrate}
Stamps:  Diamonds, Just for You (Neat & Tangled)
Paper:  White, Soft Stone (PTI)
Ink: Peacock Feathers (Distress Ink), Versamark, Black Staz-On
Misc:  Clear Embossing Powder, Color Shine Gold (Heidi Swapp), Pinking Shears, Janome Sew Mini

Wednesday, February 19, 2014

Neat & Tangled Release: Stop and Go


Welcome back to Day 3 of the Neat & Tangled February Release!  If you thought that yesterday's peeks from the DT showing the new set by Miriam Prantner were awesome......just wait until today's peeks where she has another cute set that is debuting!!!

AmyStopandGo2 


Today we are sharing inspiration using a stamp set designed by Miriam Prantner called Stop and Go.  
I've used this set along with the Sunburst Stamp for a fun take on a Encouragement card!!  

My stoplight image was colored in with Copics with a good coat of clear Wink of Stella being brushed over the colors of the stoplight.  

AmyStopandGo

That's all for today but make sure to stop by the Neat & Tangled blog for more inspiration from the rest of the DT and to check out the giveaway each day!  All 4 sets will be available for purchase Thursday, 2/20 at 8am EST.

{Go for it!}
Stamps:  Stop and Go, Sunburst (Neat & Tangled)
Paper:  White (PTI), Basic Gray (SU)
Ink:  Papaya (AMuse), Tuxedo Black (Memento)
Misc:  Foam Adhesive, Wink of Stella, Copics

Tuesday, February 18, 2014

Neat & Tangled Release: On the Corner Additions


Welcome back to Day 2 of the Neat & Tangled February Release!  Did you check out the NAT blog yesterday for all the goodness the rest of the DT shared??  Amazing.


Today we are sharing inspiration using a stamp set designed by Miriam Prantner called On the Corner Additions.  This set coordinates with the original set called On the Corner.  Such a great design and idea for a set!  

I've stamped some *more* stripes using On the Strip on either side of a white card base.  I knew I wanted to use several of the new additions stamps on my corner street sign.  So I stamped one and then a second overalapping the first.  I didn't care about this because this was my **easy** way to extend my street sign pole.....simply by attaching a sign with foam adhesive over the overlapped space where I extended my pole (and this isn't perfect by any means under the foam!)  And who doesn't love a little neon??  I've stamped some neon dots from Party Dots for a fun look that would make this a great card for a teen!

AmyOntheCornerAdditions

That's all for today but make sure to stop by the Neat & Tangled blog for more inspiration from the rest of the DT and to check out the giveaway each day!  All 4 sets will be available for purchase Thursday, 2/20 at 8am EST.

Thanks for sharing a part of your day with me!

{Kind, Amazing}
Stamps:  On the Corner, On the Corner Additions, On the Strip, Party Dots (Neat & Tangled)
Paper:  White (PTI)
Ink:  Onyx Black (Versafine), Neon inks (Hero Arts)
Misc:  Copics (T1 and T4), Foam Adhesive

Monday, February 17, 2014

Neat & Tangled Release: Hope Anchors


Welcome to the Neat & Tangled Stamps February Release!  The first release of the new year and first release with the new DT!  Welcome ladies....so glad to have you all on board!

AmyHopeAnchors2 


Today we are sharing a mini stamp called Hope Anchors.  To stay with more of a nautical theme and keep it simple, I've stamped the image and stamped another image cutting out just the mini banner adding that with foam adhesive.  What's more nautical than stripes?  I've stamped navy stripes from On the Strip 2 at a diagonal for a fun look.  What you can't see is the shimmer I sprayed over the entire card!!!

AmyHopeAnchors

That's all for today but make sure to stop by the Neat & Tangled blog for more inspiration from the rest of the DT and to check out the giveaway each day!  All 4 sets will be available for purchase Thursday, 2/20 at 8am EST.

Thanks for sharing a part of your day with me!

{Hope}
Stamps:  Hope Anchors, On the Strip 2 (Neat & Tangled)
Paper:  White, Melon Berry (PTI)
Ink:  Navy (AMuse)
Misc:  Foam Adhesive, Vanilla Shimmer Mist

Saturday, February 15, 2014

Curtain Call Inspiration Challenge: Cozy Quilt


I'm so excited to be here not only for the Curtain Call Challenge but also on behalf of the DT for Lil' Inker Designs!  I have been so fortunate to be on the LID DT since the beginning and I know that Laura is just getting started with her fabulous designs!  


We have a fabulous new sponsor, Lil' Inker Designs with A.G., for the Curtain Call Inspiration Challenge: Cozy Quilt challenge!  The LEAD of this challenge will receive a $30 gift certificate to Lil' Inker Design!


Here's what I've whipped up for this challenge!  I've used the Circles and Diamonds Stitched Pattern Die along with the stamps from the Darling Diamonds Stamp Set and created a baby card.  With that inspiration photo, this is where it lead me!  This die just comes to life when you add color!!!  

To add a bit more stitching detail, I've added a Stitched Scallop Border Die to accent my stamped circle and diamond pattern.  The Congrats sentiment comes from the set called Spot On.

Amy2.15.14


You won't want to miss what our special guests and crew have whipped up for Cozy Quilt!

Cozy Quilt Designers

{Congrats}
Stamps:  Darling Diamonds, Spot On (Lil' Inker Designs)
Paper:  White, Harvest Gold (PTI)
Ink:  Provincial Gray, Pink Lemonade, Basil, Island (Fresh Ink), Papaya (AMuse)
Dies:  Circles and Diamonds Stitched Pattern Die, Stitched Scallop Border Die (Lil' Inker Designs)
Misc:  Foam Adhesive, Corner Chomper

Thursday, February 13, 2014

A farewell...........


This is a farewell post for my term over at CAS-ual Fridays Challenge!  It's been fun to share over at CAS-ual Fridays but all good things must "move on" as I say!


This week's challenge is goodbye or farewell cards that are long (2 x 4, 4 x 6 etc)
*It's a 1 week challenge and the sponsor this week.......CAS-ual Fridays!!*

I've been seeing lots of watercoloring out there lately so I thought I'd do a resist watercolor.  I've stamped my sentiment (Treasured Words by Verve) and then clear heat embossed my floral image (Surely Goodness by Verve).  Taking Worn Lipstick and Shabby Shutters Distress Inks........I very quickly watercolored using my waterbrush over my floral image taking care to be a "little" messy outside the lines a bit for that true watercolor look.  If you know me at all, you know that I love my Distress Inks!

2.14.14 

After my image was completely dry, I attached it to a Berry Sorbet card base.  The splotches across my card are made with Smooch Spritz Vanilla Shimmer over the entire surface......it's so shimmery in real life!  I still wanted to be able to use an A2 envie for this card so I simply trimmed it to 3 1/2 on the short side.

Thanks for sharing a part of your day with me!

{promise}
Stamps:  Surely Goodness, Treasured Words (Verve)
Paper:  White, Berry Sorbet (PTI)
Ink:  Tuxedo Black (Memento), Versamark, Worn Lipstick and Shabby Shutters Distress Inks
Misc:  Twine (The Twinery), White Enamel Dot (MME), Waterbrush, Smooch Spritz 

Confetti Camera Day!


Hi everyone!  I have a post up over at Reverse Confetti today for the Confetti Camera series!  I'd love for you to check it out!  It may have some *gold* on it!!


A *small* sneak peek................


Celebrate the creative side of you!!

Wednesday, February 12, 2014

All about stripes......


Have you been following the 7th Anniversary challenges over at PTI this week?  I could not pass up today's challenge......to incorporate stripes!!!  I knew the perfect way I was going to do this........using the Lil' Inker Designs Cover Up Die: Stitches and Stripes!!!!

I die cut my Cover Up Die with white cardstock.......then stamped Bigger Blooms from PTI in shades of pink, blue, and yellow onto my die cut panel.  I love how some parts of the blooms are missing!!!  The stitches leave such a fabulous look to the diagnonal stripes where my sentiment was stamped.  My whole panel was adhered to a Basic Gray card base with foam adhesive (yes! I used lots!).

Hip Hip Hooray!

Anniversary-blog-header

Thanks for sharing a part of your day with me!

{Hip, Hip, Hooray!}
Stamps:  Bigger Blooms (PTI)
Ink:  Fresh Ink/Amuse Ink
Dies:  Cover Up Die: Stitches and Stripes (Lil' Inker Designs)
Misc:  Foam Adhesive

Related Posts with Thumbnails