Thursday, March 30, 2017

Coffee & Friends

Freshly Made Sketches

Hello!  
One more card for today........I couldn't let the Spring 2017 Coffee Lovers Bloghop go by without using my Reverse Confetti coffee goodies especially since they are a sponsor!
Spring Hop 2017

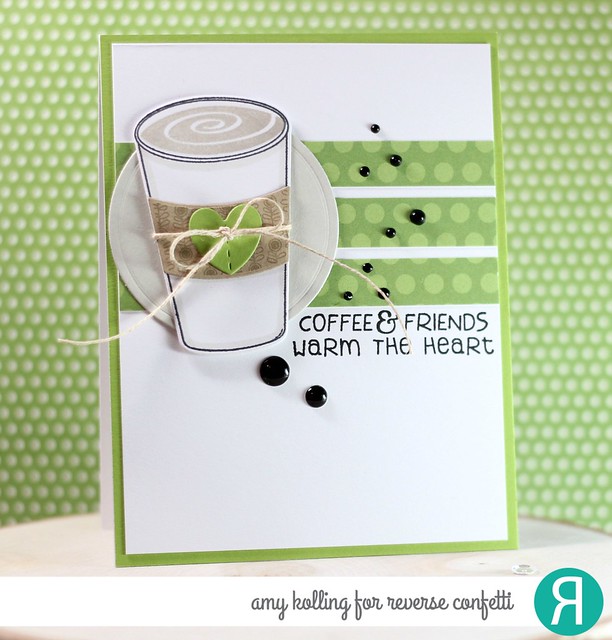
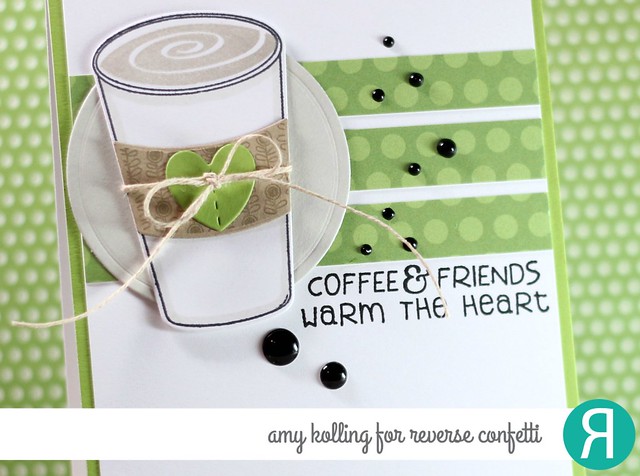
I went for a sketch to get me started with this card.  I wanted the large to go coffee cup to be center stage.  When I found the new sketch this week from Freshly Made Sketches, it was the perfect fit!  

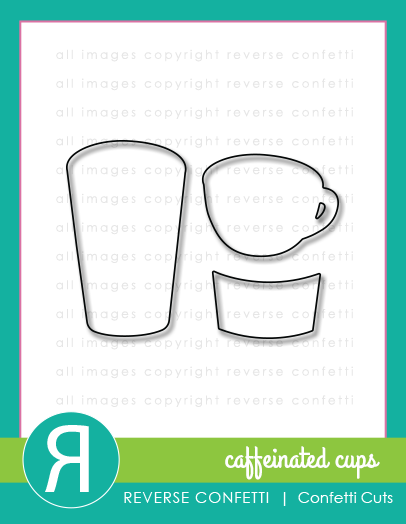
Using pattern paper from Fright NIght, I trimmed three strips and adhered to a white panel.  My to go coffee cup, from Caffeinated Cups, was adorned with a kraft cozy, die cut heart (from XOXO Hearts Confetti Cuts), and some kraft twine.  I layered the coffee cup over a Stone diecut circle.  Although the Be a Barista stamp set is OOS currently, I HAD to use this sentiment!  To finish, I added this panel to a Lime Green layer of cardstock and added random sizes of Black Nuvo Drops.

Freshly Made Sketches2


Thanks for sharing a part of your day with me!

National Craft Month Celebration Blog Hop

NCM Blog Hop

Hello!  There is a special blog hop happening today featuring Right at Home Stamps in celebration of National Craft Month!  I have the best time hosting Stamping Away Weekend once or twice a year and last fall Nicole sponsored our weekend with this AMAZING crafty set for each one of the attendees!  It was a HUGE hit!

Make Something Beautiful is now officially released for the celebration of National Craft Month!  


Make Something Beautiful has some fun crafty images along with fantastic sentiments for your crafty friends!  I chose to highlight most of the images by spotlighting them with different colors of inks!  A perfect technique if you don't want to color!  ☺

I started by stamping my crafty outline images in Memento Tuxedo Black ink on a trimmed white panel.  Using Lawn Fawn inks (these are amazing BTW), I used the large circle image from Abstract Florals to do some spotlight coloring.  For my sentiment (and isn't it the cutest????), I white heat embossed it onto a black cardstock strip.  I added one die cut heart from the Cup of Joy Die Set with a tiny clear rhinestone to finish.

NCM Blog Hop2

Giveaway time!  
Who doesn't like a Blog Hop without a giveaway?!  Make sure to comment along the way during the hop because Nicole will be giving away this stamp set on the Right at Home Blog.  So make sure to check there for all those details!


Here's the blog hop line-up to see even more inspiration using Make Something Beautiful!  In case you get lost along the way, you can head over to the Right at Home blog and start there!


Rose Terrace and The Ton

Hello!  I'm here with my last post as Guest Designer for The Ton. I guess you could say, going out in style!  

The Ton has some FABULOUS background stamps that lend themselves to many, many techniques.  I have been in love with the Rose Terrace Cling Background since it was released so I was excited to work with it!  

Here is a glimpse into one of the techniques I've used with this background stamp.  I would LOVE for you to check out my post over on The Ton Blog!

Rose Terrace2


Thanks for sharing a part of your day with me!

Pretty Pink Posh Easter Theme Week

Easter Week

Hello!  Welcome to the Pretty Pink Posh Easter Theme Week!
The Design Team has shared many ideas using the newest Easter products over the past few days.  Make sure to check them all out!


I wanted to create a card with the bunny image, from Easter Friends, popping out of windows.  Pretty Pink Posh has lots of choices for dies when it comes to this technique.  I chose to use the Stitched Pieces Die.  I created a white panel using this die as it cuts the rounded rectangles out leaving stitching on the negative piece.  I used the negative piece, trimmed down, and rounded the corners to match.  To a top folding card, I added some plaid pattern paper and added my white die cut Stitched PIeces panel with foam adhesive.  I didn't want the pattern paper behind my images so I used the rounded rectangles cut earlier and lightly blended Distress Inks in shades that matched the pattern paper.  These were adhered through the "windows".

Easter Week2

My images were Copic colored and die cut using the Easter Friends Die Set.  Then I decided where all my elements were going to go.  Once this was done, I used the "Hi!" sentiment from Everyday Greetings Stamp Set and stamped it in each window.  Using a non-Easter sentiment, made this a card that could be given anytime in the spring (if you left off the colored eggs!)  Now the fun part was assembling!  My bunnies were popped up with foam adhesive from each window tucking the bottom into the frame.  One little colored egg was added to each bunny to carry.  To finish, a few sequins from the Friendship Sequin Mix were added for some sparkle.


Easter Week3

Thanks for sharing a part of your day with me!

Wednesday, March 29, 2017

Happy Camper with Avery Elle


Glamper Campers

I am sharing a card that can be seen over on the Avery Elle blog today using Glamper Campers.
Glamper Campers.........OH MY GOODNESS this set is just the cutest!!!  I just love this adorable camper image.  I colored it with pastel colors and neutral greys.  I couldn't resist adding one of the flamingo iamges for some "yard art"!  My images were layered over some pattern papers from The Neutral Collection and The Sorbet Collection.  The sentiment was stamped onto a banner from Pierced Banners Layers Elle-ments.  I added a few matching pink enamel hearts for fun!

Glamper Campers2

Thanks for sharing a part of your day with me!

SugarPea Designs Birthday Bash Blog Hop


Welcome to SugarPea Designs 3rd Birthday Bash Celebration!  

 I am so honored to be a part of this amazing company and to help celebrate their birthday!  Today’s festivities included some incredible inspiration from the SugarPea Design Team and some of our very Special Guests.  

Now you can’t have a Birthday Bash without prizes and there are lots of prizes to be won! A few of our blog hop participants will be giving away a SugarPea Designs stamp set, so please leave comments for each hop participant for your chance to win! In addition to this, ONE lucky winner will be randomly chosen from all comments left to receive a $100 Gift Certificate to SugarPea Designs. You have until April 15th to enter to win. Winners will be announced on April 17th.
Want to shop for some SugarPea Designs products?  We have a special coupon code just for this celebration.......BDAY03.  Use this code for 10% off your entire purchase until April 2nd!

But that’s not all…we also want YOU to be part of the party by sharing a card with us.
Once you have completed the hop, we’d love it if you’d keep the celebration going, by creating a Birthday card or project and linking it up at the SugarPea Designs Blog for a chance to WIN a Mini MISTI and Creative Corners Tool.

***********************************************

I couldn't let a celebration go by without using my favorite celebration sets........Celebrate All The Things and HB2U.  I've stamped my balloons in rainbow dye inks and overstamped using the same colors of ink but stamping 4 times for a darker shade using the confetti stamp from the set.  
3rdBirthdayBash0
The sentiment was done using the Celebrate SugarCut Die in black glitter cardstock and added with a few layers of black cardstock for dimension.  To finish my sentiment, I white heat embossed "let's" onto black cardstock and added with foam adhesive.

3rdBirthdayBash2
Here's the Blog Hop Line Up:


Tuesday, March 28, 2017

Spring Coffee Lovers Bloghop

CLH17

Hello!  I'm excited to be playing along with the Spring 2017 Coffee Lovers Bloghop this year as someone who now drinks COFFEE!  Yes.....I have started with some basics and probably foo-foo but I am enjoying a cup a day!
Spring Hop 2017

I've used several different sets from Lil' Inker Designs for my fun, layered (yes, I said layered) coffee themed card.  I started with 2 layers die cut with the Stitched Mats: Rounded Rectangles.  I had some Distress Oxide panels left over that I didn't like for a background so I used them to die cut my coffee cups (from Coffee Cozy Die Set) and the Coffee Word Die.  I love how they look like they have a "chalky" finish.  My sentiment, from Coffee Cozy Stamps, was stamped with Broken China Distress Oxide ink onto white cardstock.  My coffee cups were layered over the heart die from Sweet Celebration Dies.

CLH17#2


Pastel graduation using Right at Home Stamps

His Love

Hello!  I wanted to share a pastel "graduation" card using two of the newly released March stamp sets from Right at Home Stamps.......Bunny Hugs and His Love.  His Love stamp set has wonderful messages and one in particular makes me think of graduation.  With that season upon us, we have several graduations upcoming and this will be perfect for those!  

"Of this be sure:  You do not find the happy life, You make it.----Thomas S. Monson"


I stamped many of the flowers from Bunny Hugs in two different shades of the same color in a spring palette.  I intertwined one of the vine/leaf images to create my own background.  I also used the tiny flower image to "fill in" some of the areas for more color using the darker shade of the ink colors.  I added tiny white dots to the flower centers with a white pigment ink pen.  It's those tiny details that add that punch.  

The sentiment was stamped in Versafine Onyx Black ink over top of some of the flowers.  I love doing this when you have a lighter stamped panel.  I adhered this panel with foam adhesive to a matching cardstock panel that was diecut with the largest frame from Find the Beauty Die Set.  I purposely kept this simple adding no further embellishments like sequins or enamel dots so I can easily slip this in the mail come graduation time.  

His Love3

Thanks for sharing a part of your day with me!

Saturday, March 25, 2017

CAS(E) this Sketch and Reverse Confetti

CAS(E) this Sketch!

Hello!  I love a good sketch and CAS(E) this Sketch! never fails me!  Maybe it speaks to my simple style or maybe it's all the DT's inspiration!  

For this sketch, I went with some older Reverse Confetti products..........Shine from Within and Seeing Stars Confetti Cuts.  I distressed a panel of white cardstock with shades of Distress Ink and splattered water droplets across the panel and lifted some of the color.  My star dies were cut with some amazing silver glitter paper from DCWV.  The sentiment was white heat embossed onto a banner of vellum.  To finish my edges, I used the Office Edges Confetti Cuts to add some "stitching" to the perimeter.

CAS(E) this Sketch!2


Here's the graphic for CAS(E) this Sketch #214!  


Related Posts with Thumbnails